When we switched to AT&T Fiber, I needed to put their gateway/router device into IP Passthrough mode so that I could use my existing mesh routers. (However, these steps will work with any third-party router.)
It was a little more confusing than I expected. For my own reference, and for anyone else who might stumble upon this in the future, here’s everything I had to do to turn AT&T’s gateway into basically just a modem.
If you don’t enable IP Passthrough, you can technically still use your mesh network, but you’ll create a double NAT situation on your home network. That will prevent you from hosting a device like a Raspberry Pi as a server and could impact some online gaming.
I’m providing links in each of these steps, but your IP address for your gateway might vary. These links worked for me on two AT&T gateways: BGW210 (now mostly retired) and BGW320-500 (still in use as of 2026).
Prerequisites
Before you start, you’ll need the device access code to your AT&T gateway. Mine was on a sticker on the back. As you start making changes in the steps below, you’ll get prompted for it. You’ll also need an ethernet cable.
As a heads up, you might get a “not secure” warning in your browser as you configure your gateway. It’s safe to ignore and proceed since you are just accessing your local network hardware.
Step 1: Connect Your Router to the AT&T Gateway
Connect your router's WAN or Internet port to the AT&T gateway using the ethernet cable. On the AT&T gateway, plug the network cable into one of the network jacks. You shouldn’t have anything else connected directly to the AT&T gateway. Think of your gateway as nothing more than a modem. Everything else in these steps is to make it function as one.
Step 2: Ensure Only One Connected Device
I had a few devices directly connecting to my AT&T gateway, both wirelessly and wired. I needed to make sure they were all only connecting to my router's network.
Go to http://192.168.1.254/cgi-bin/devices.ha and verify the only item there is your router.
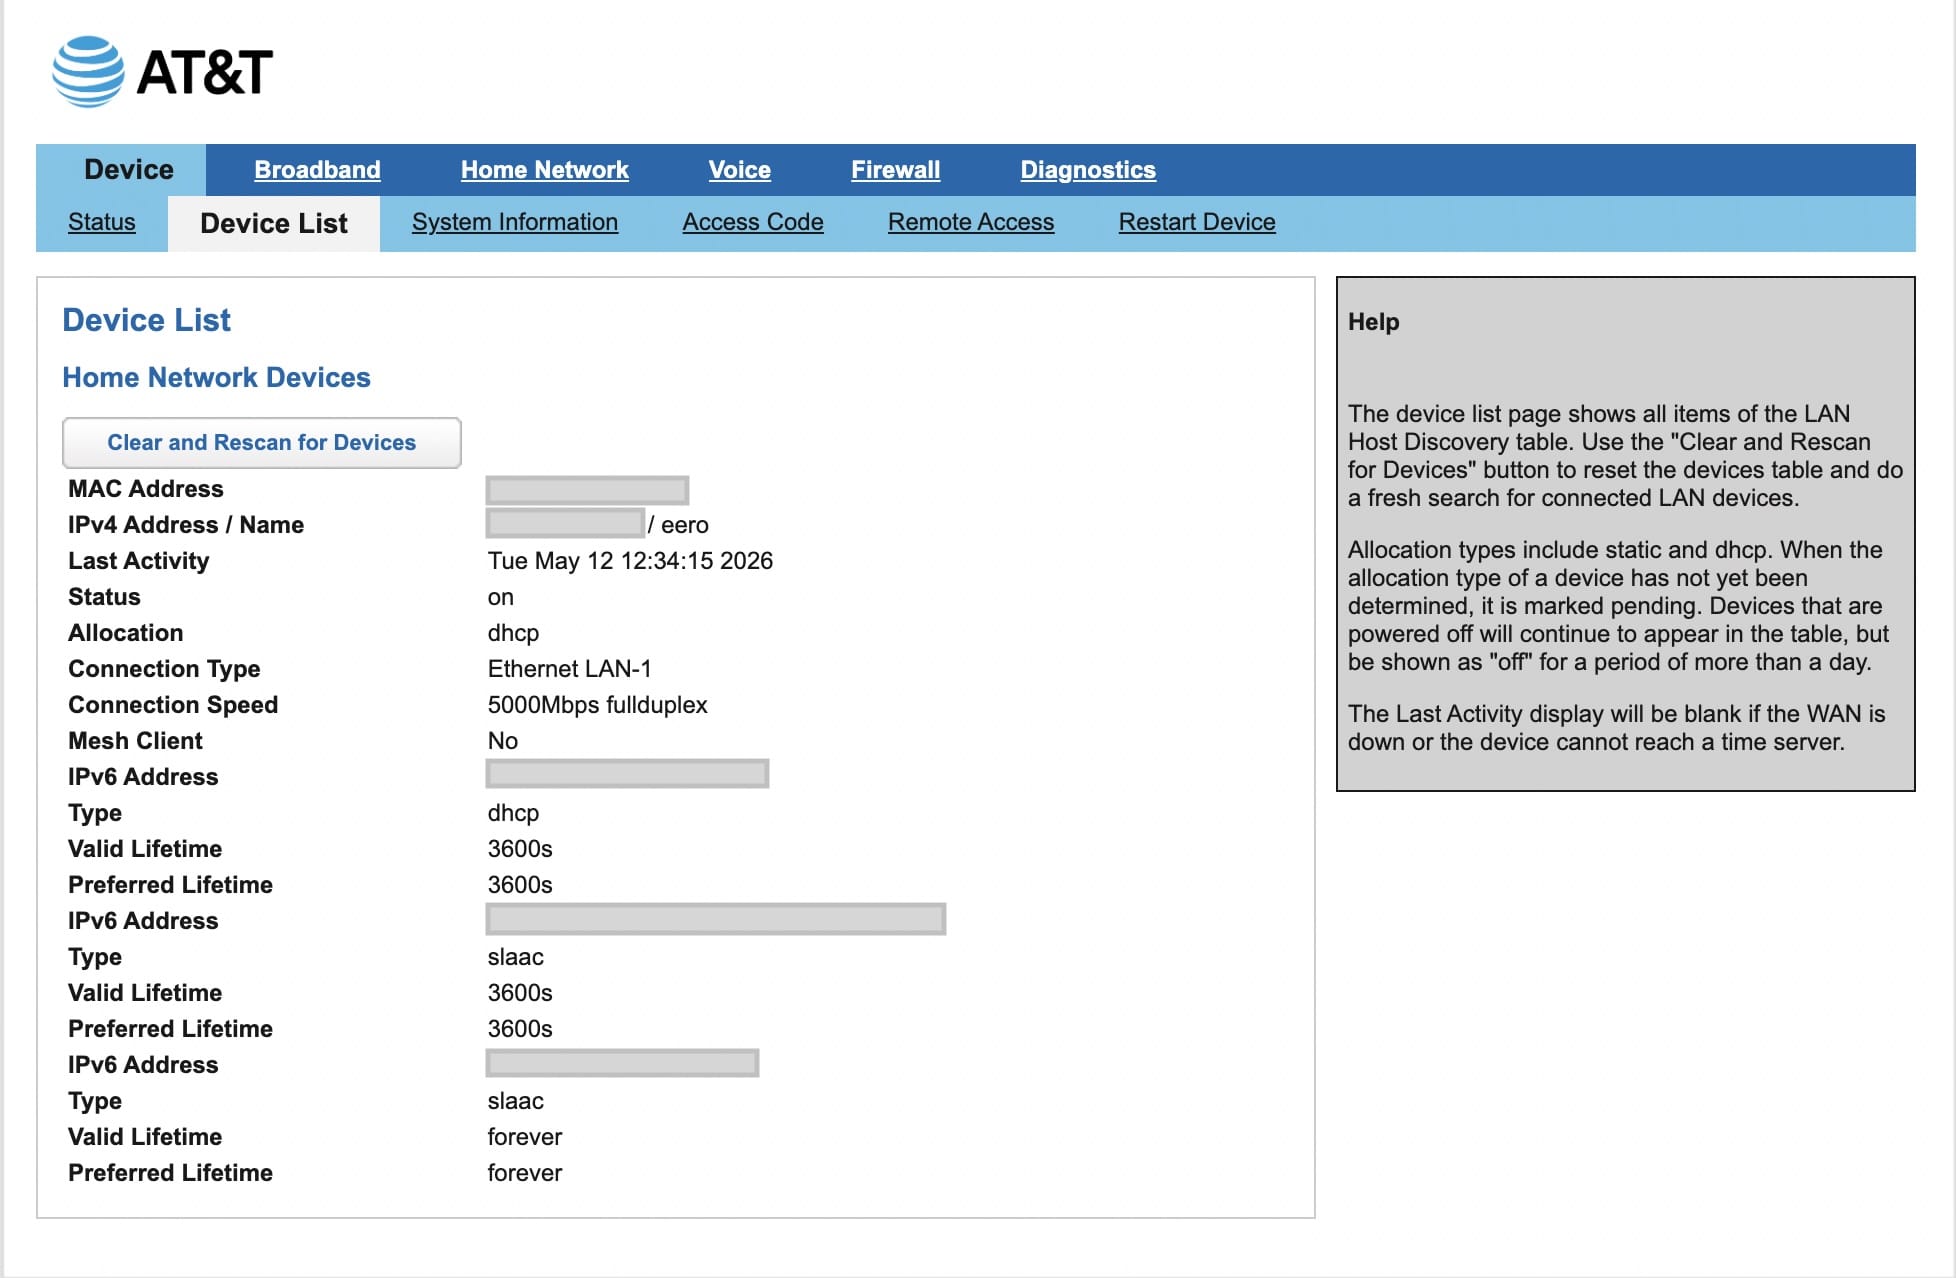
If you see any other devices, you’ll need to track them down and ensure they are connecting to your router’s wireless network and not the AT&T gateway. Anything hardwired will need to be plugged into the router instead of the gateway.
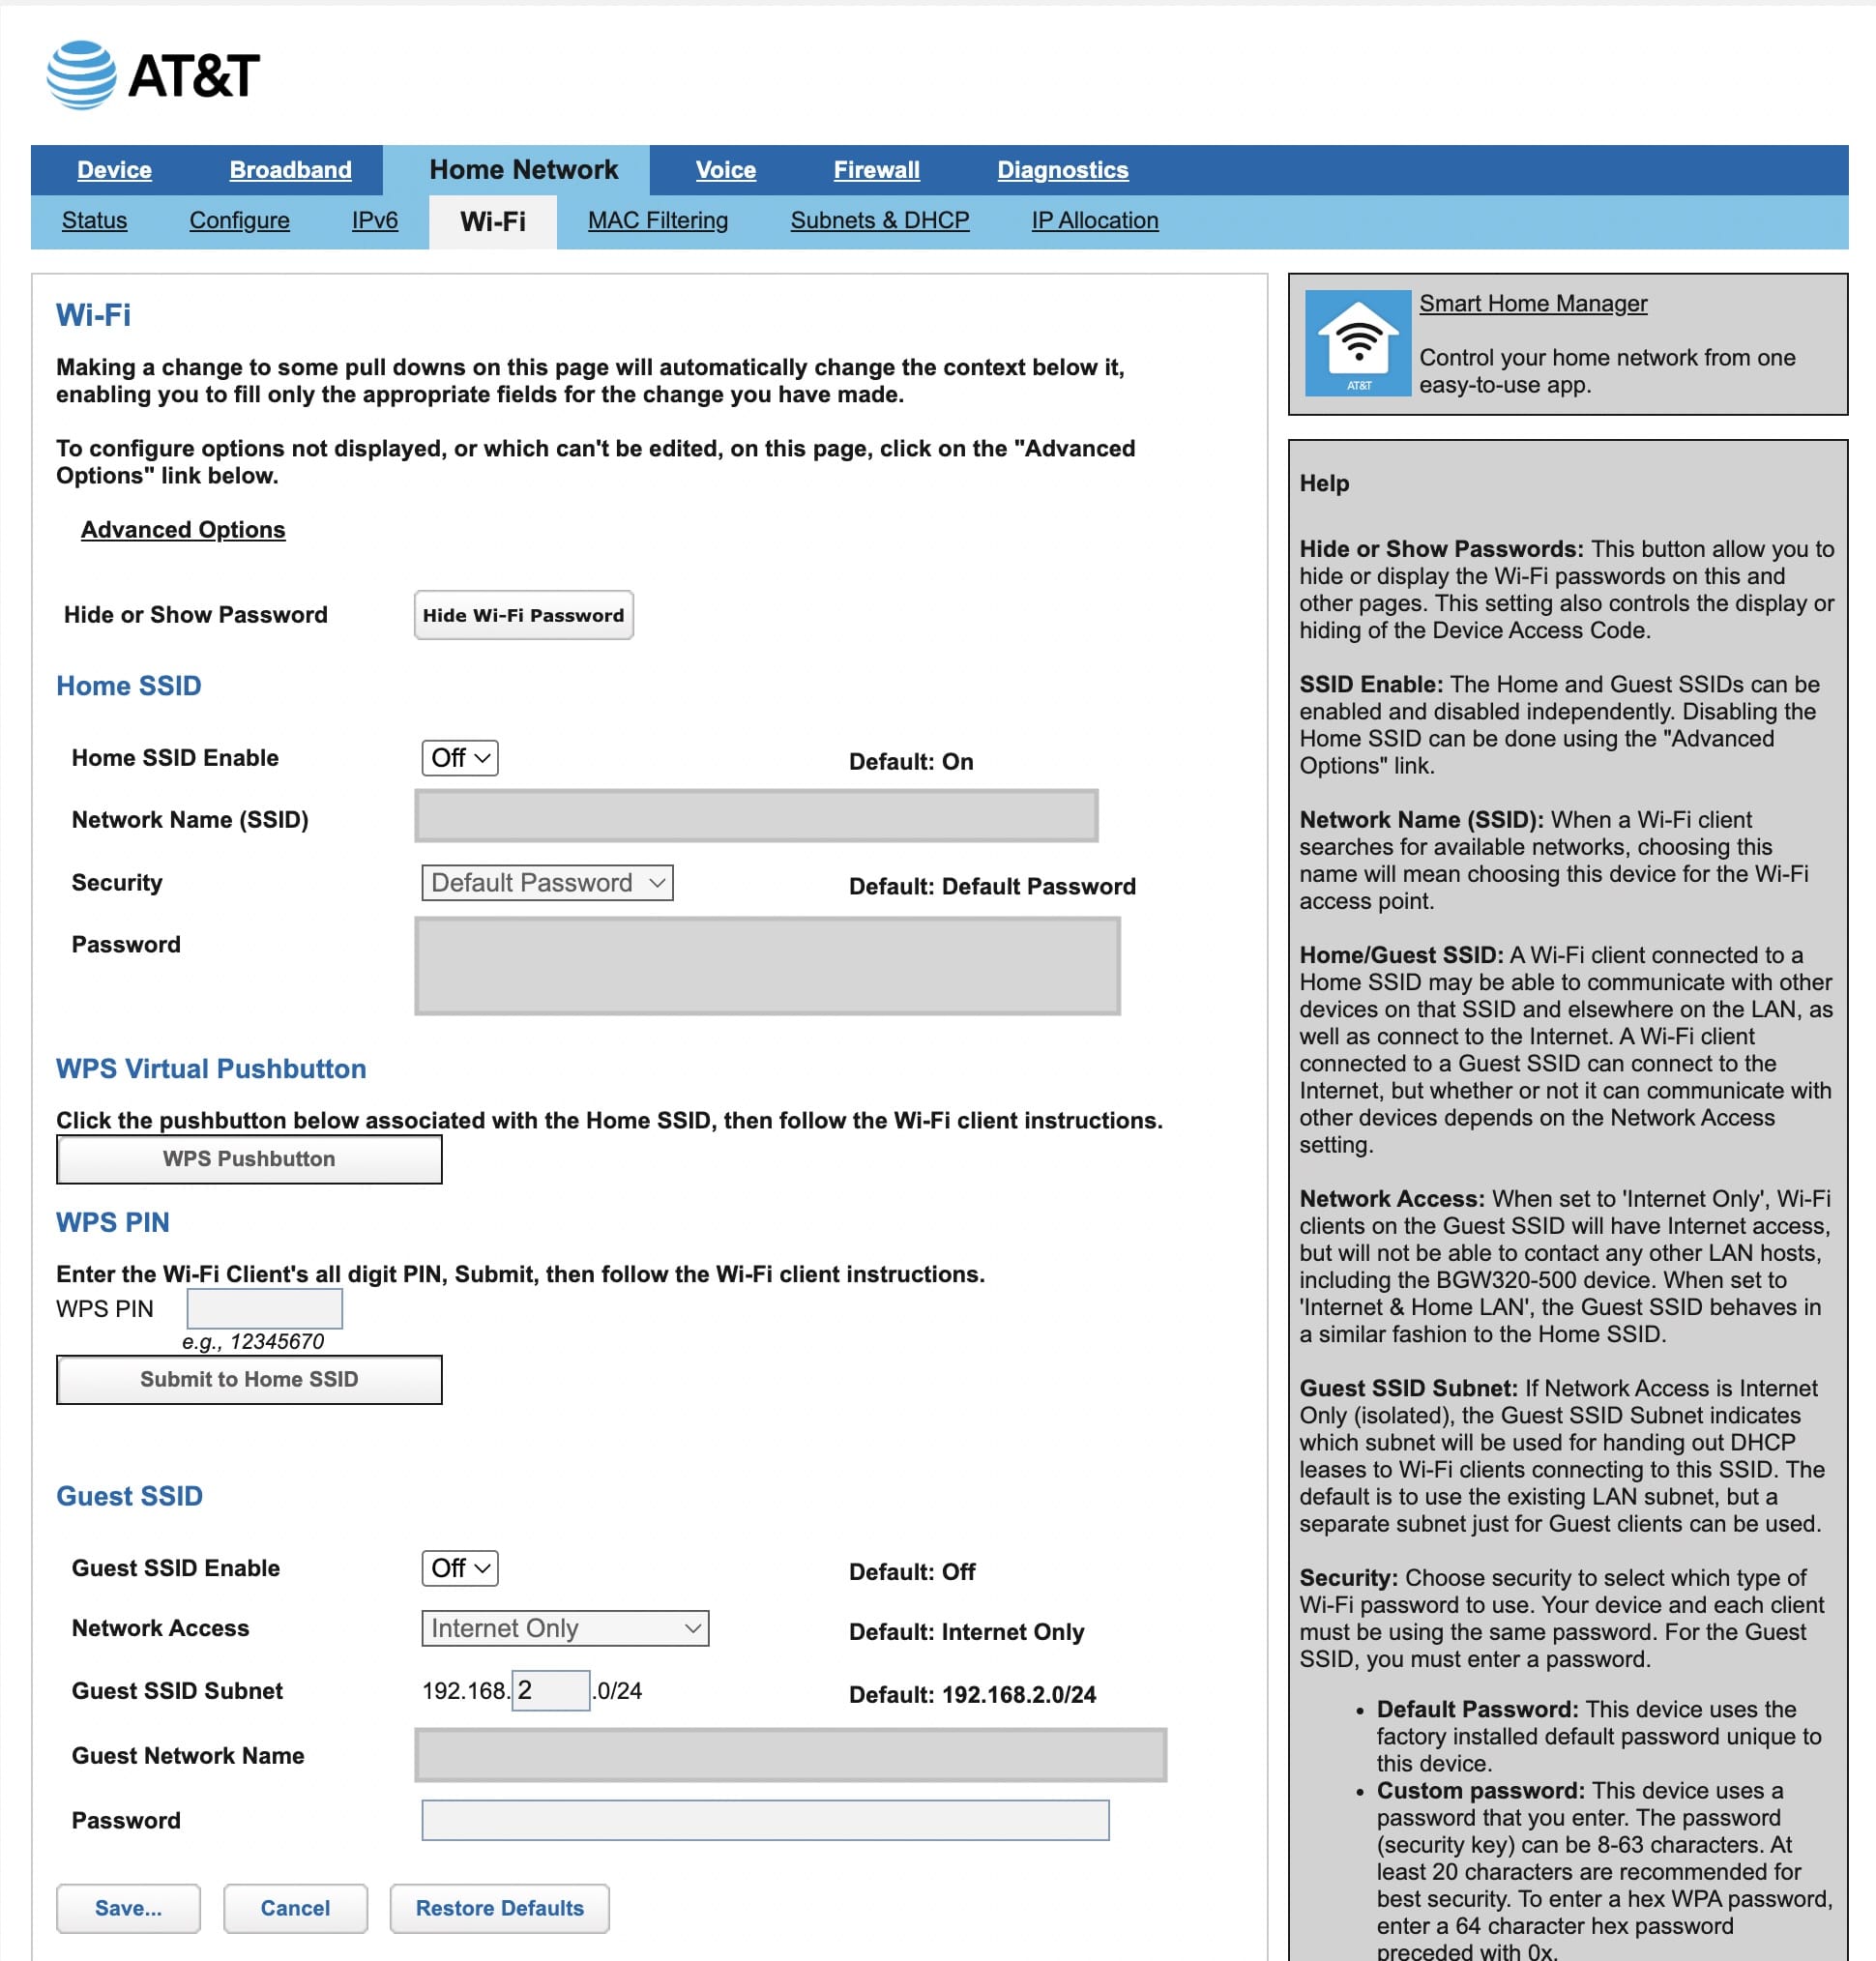
Step 3: Disable Wi-Fi on the AT&T Gateway
We don’t want overlapping wireless networks from both the router and the AT&T gateway. We need to disable all of the wireless networks on the AT&T gateway.
Go here: http://192.168.1.254/cgi-bin/wconfig.ha
You want to disable all wireless networks. For me, that meant turning off the 2.4GHz network, the 5GHz network, and the guest network.
Step 4: Disable All Packet Filters
We don’t want the AT&T Gateway to filter packets. If necessary, that’s something to do on your router, not on the gateway.
Go here: http://192.168.1.254/cgi-bin/packetfilter.ha
Ensure that packet filters are disabled. If you like, you can also delete the presets that are there.

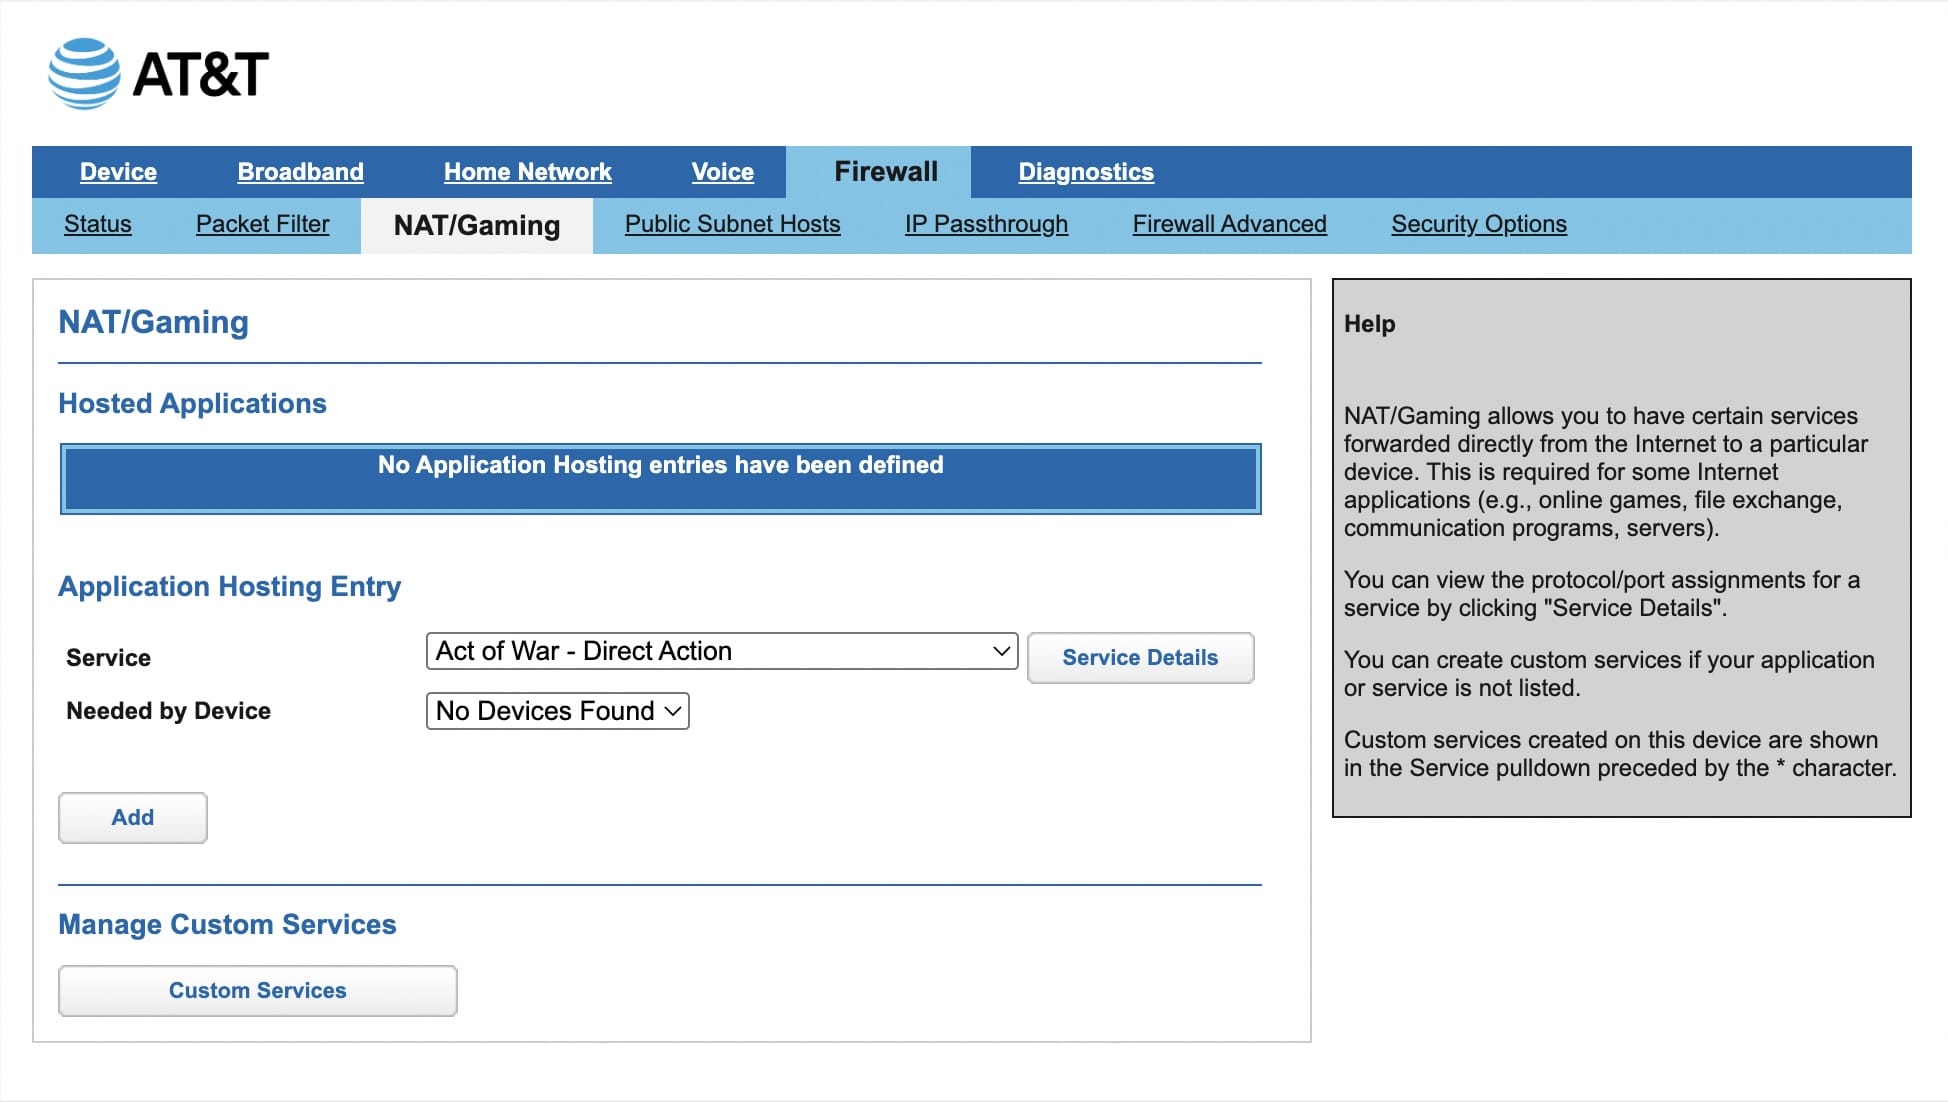
Step 5: Disable All NAT/Gaming Settings
Same as in step 4, while we may want to configure NAT, we want to do it on our router and not on the AT&T gateway.
Go here: http://192.168.1.254/cgi-bin/apphosting.ha
Ensure that you have no hosting entries defined.
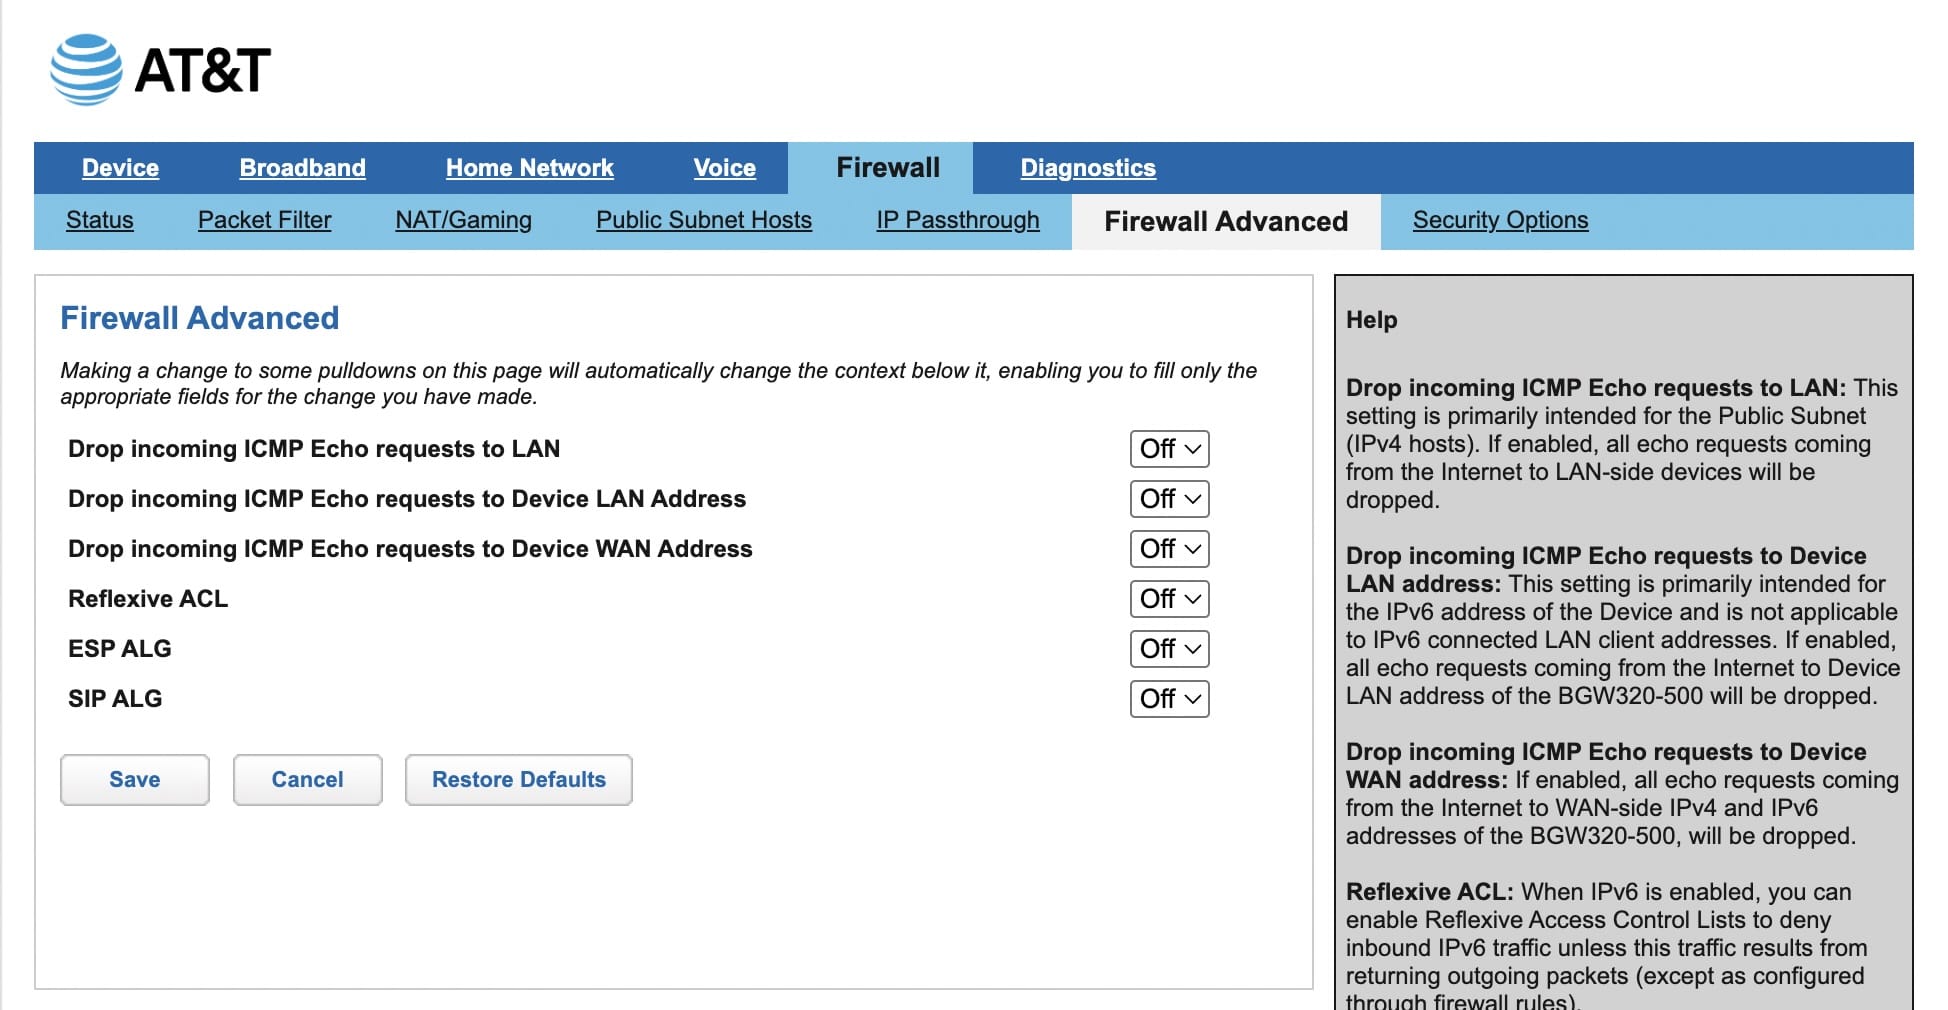
Step 6: Disable Firewall Advanced
To be clear, we aren’t completely disabling firewall protection on the network. It’s the same logic as in step 4 and step 5. We want to disable it on the AT&T gateway and let our router handle all firewall blocking. If both are enabled, it could make it a headache to troubleshoot if something is wrong.
Go here: http://192.168.1.254/cgi-bin/dosprotect.ha
Verify that everything is set to off.
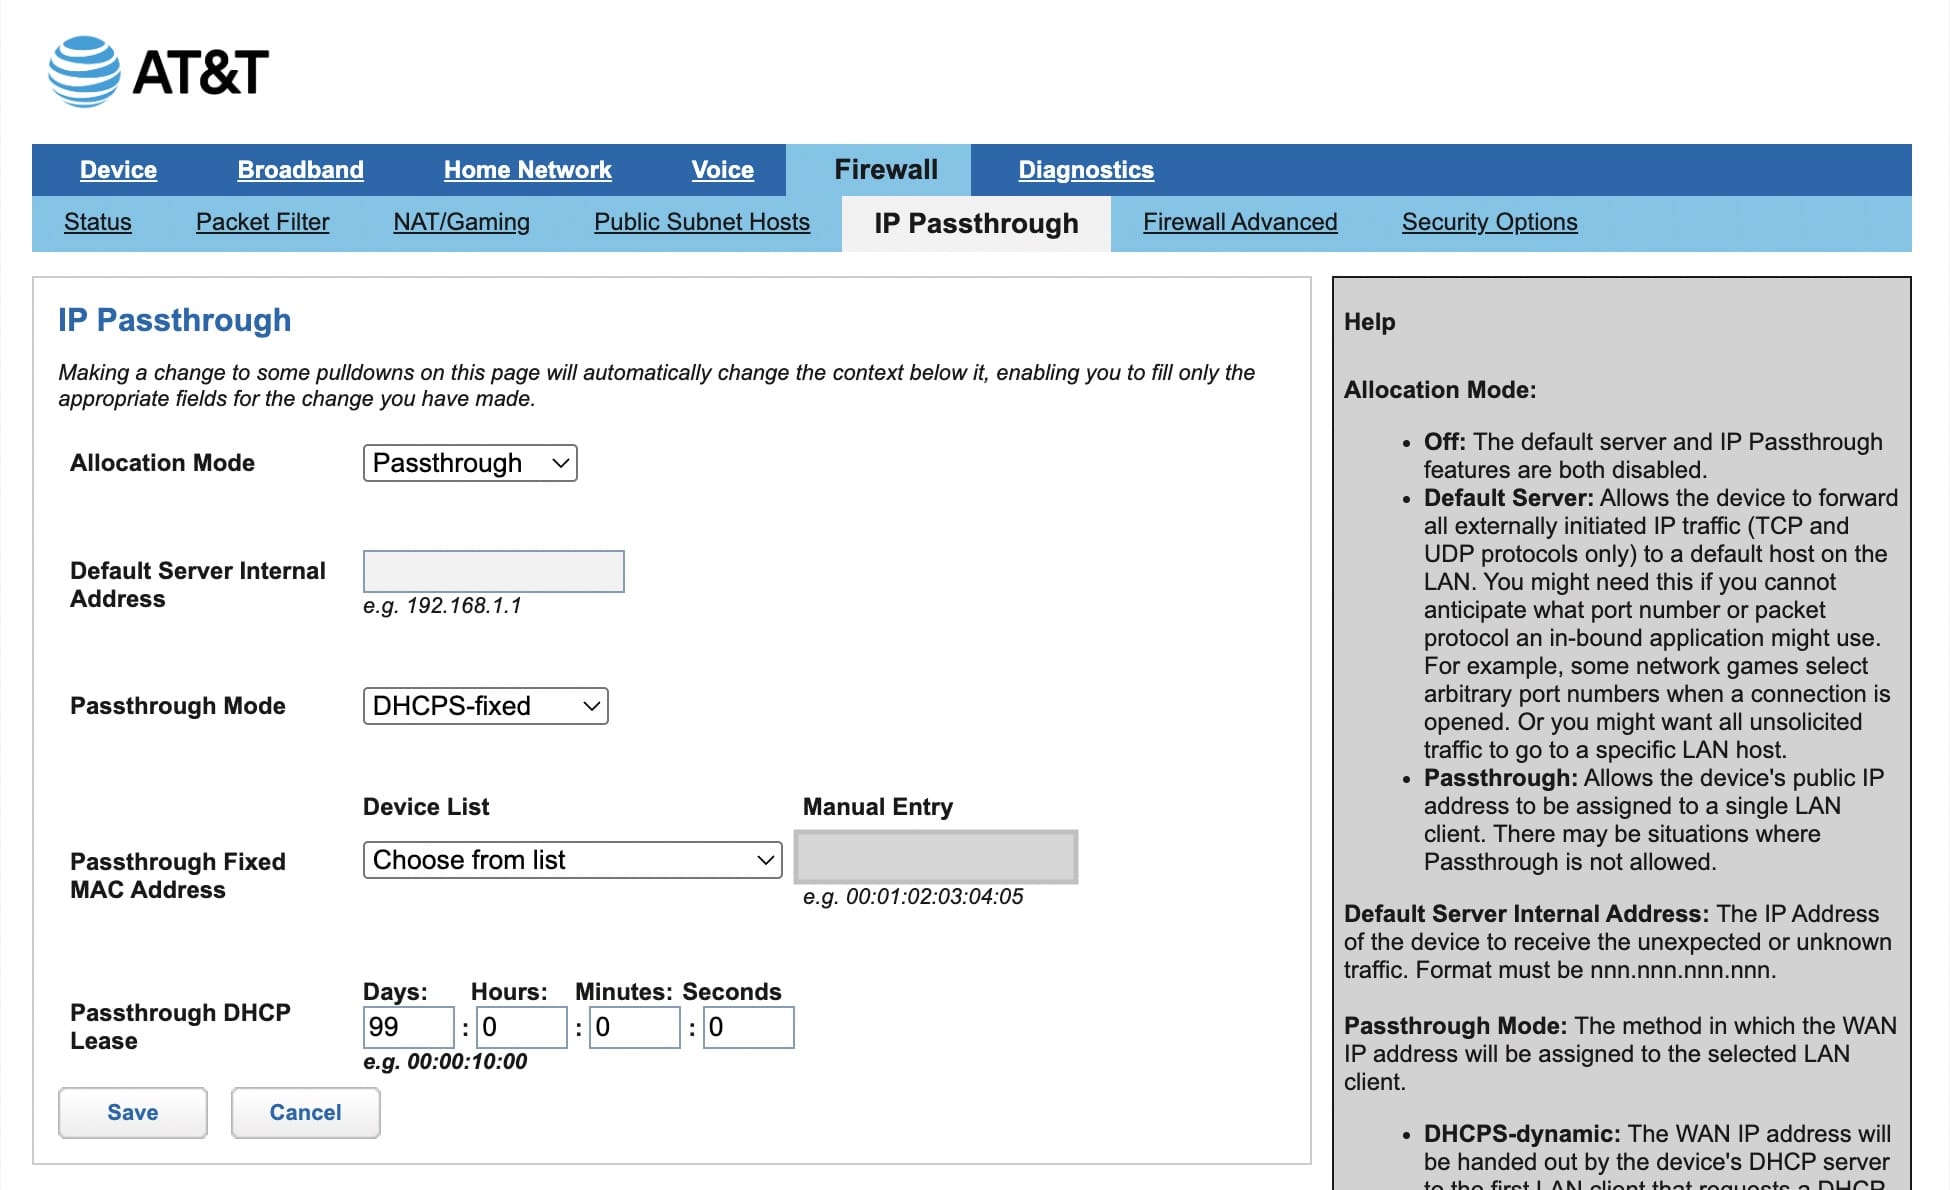
Step 7: Enable IP Passthrough
Now that everything is turned off, we can enable IP Passthrough to the router. Go here: http://192.168.1.254/cgi-bin/ippass.ha
You will want to toggle Allocation Mode to passthrough.
For Passthrough Mode, I went with DHCPS-fixed. This might be a little bit overkill since the router is the only thing connected to my AT&T gateway. But there’s no reason not to ensure that the gateway always chooses the router as the device for IP Passthrough.
Since we’re going with fixed, we want to choose our router in Passthrough Fixed MAC Address. If you click the dropdown list, the only item there should be the router. (If there are others, you still have devices directly connecting to the gateway and will want to fix that first.)
For Passthrough DHCP Lease, I made it 99 days. That’s the maximum length that the gateway allows me to select.
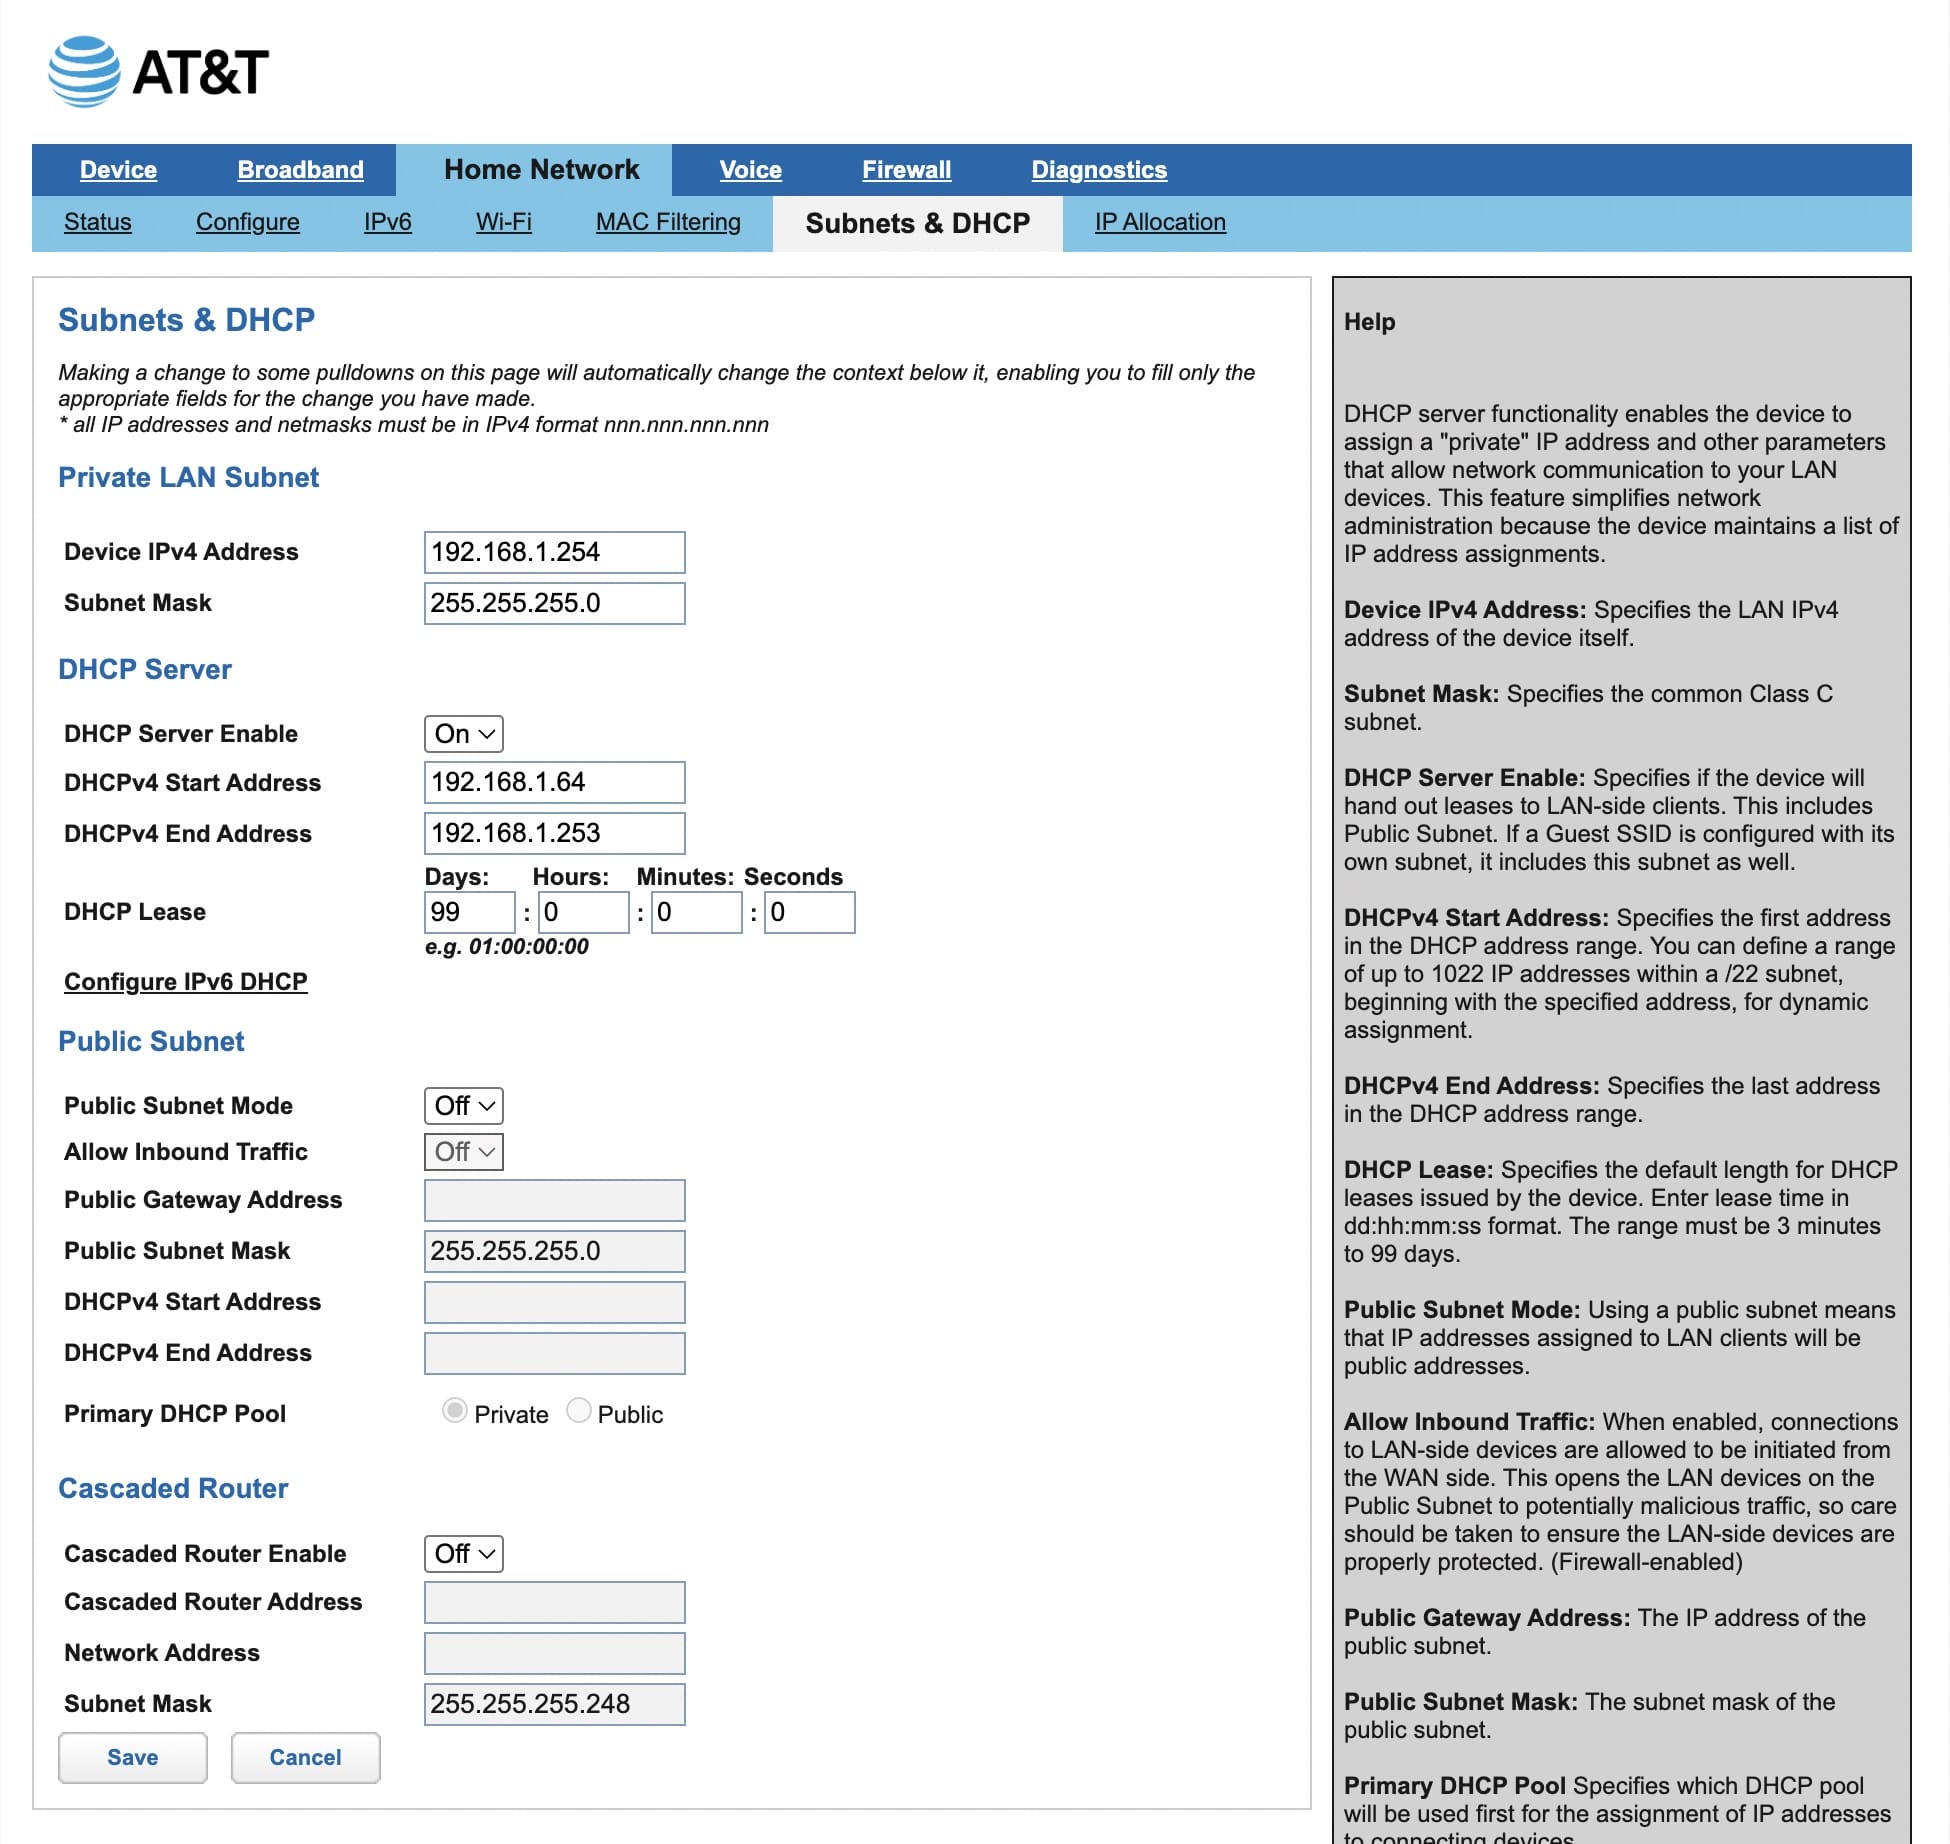
Step 8: Subnets & DHCP
Same as before, we want to ensure the AT&T gateway is acting as nothing more than a modem while letting our router do the heavy lifting. Your settings may vary here, but these are my IPv4 settings. The important section here is to verify that the Public Subnet and Cascaded Router are disabled.
Step 9: Reboot and Verify Firewall Status
At this point, everything should be set on the AT&T gateway. Reboot both the gateway and then the router. Let them boot up and connect to the internet. Once you’re back online, let’s verify everything is working correctly.
The first stop is the Firewall settings page: http://192.168.1.254/cgi-bin/firewall.ha
You should see Packet Filter set to off, IP Passthrough showing as on, and NAT Default Server as off.
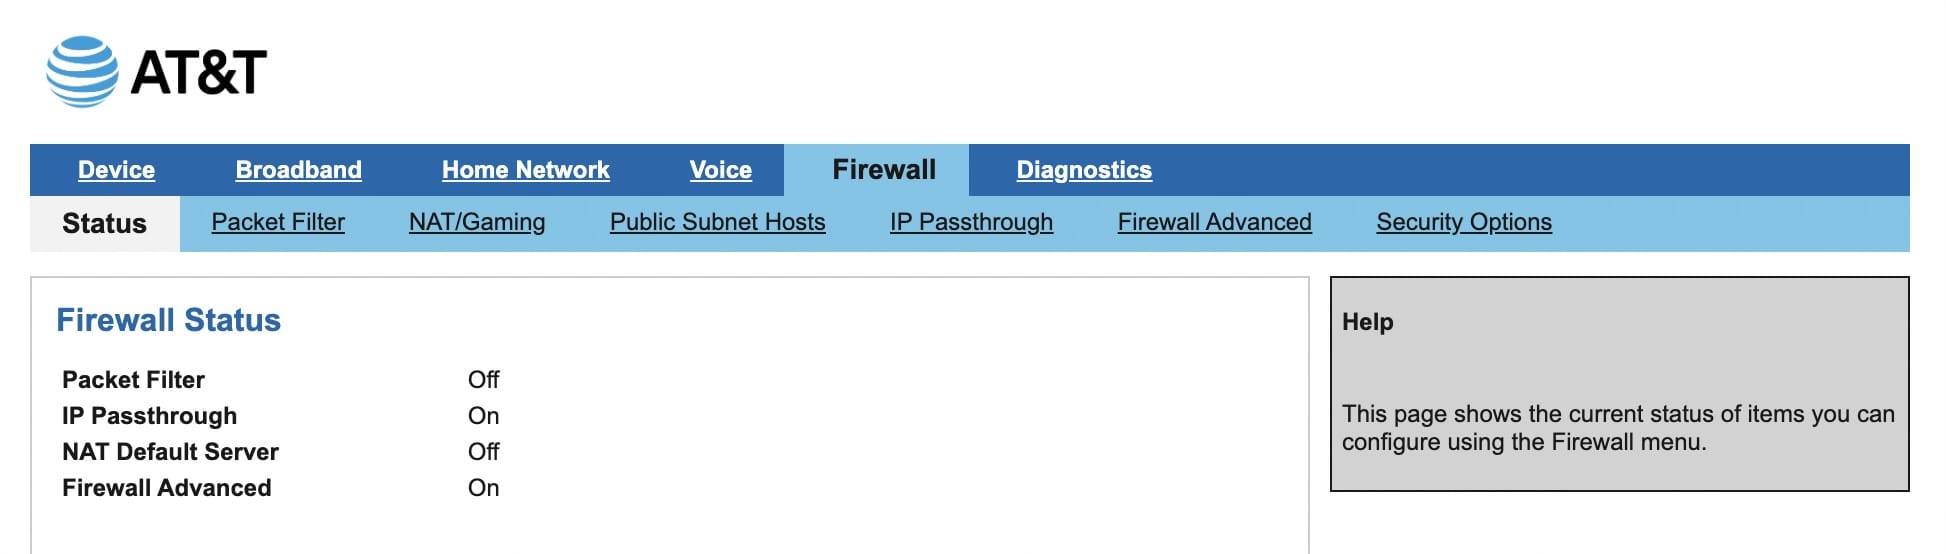
Firewall Advanced is worth noting because it confused me. On my first AT&T gateway, I didn’t have that. But when AT&T mailed me a new gateway after my initial one was retired, I noticed that Firewall Advanced shows as On.
Let me save you some headaches and confusion. For me, this seems to be a red herring. If you went through all the steps above, everything about the firewall is disabled. When I tested things, I couldn’t see any indication that there was an additional firewall coming from AT&T’s gateway.
The only thing that makes sense to me is that perhaps this is related to AT&T’s Active Armor product. I don’t use it nor have their app, but I know both my AT&T fiber plan and AT&T wireless plan include it for free. Perhaps it is somehow enabled on my account and thus showing here.
Regardless, I wanted to note this because it confused me when I was setting up my second AT&T gateway. If you know what this is or how to get it to show as off, please send me a DM and let me know. I’ll update here if I ever learn more as to what this is.
Step 10: Final Verification on AT&T Gateway
All that’s left is to verify a few final things. Go here: http://192.168.1.254/cgi-bin/home.ha
You should see your Broadband Connection as up, both wireless networks showing as disabled, and exactly one home network device. It should be your router and connected via ethernet. Most importantly, the device IP address should be your public IP address.
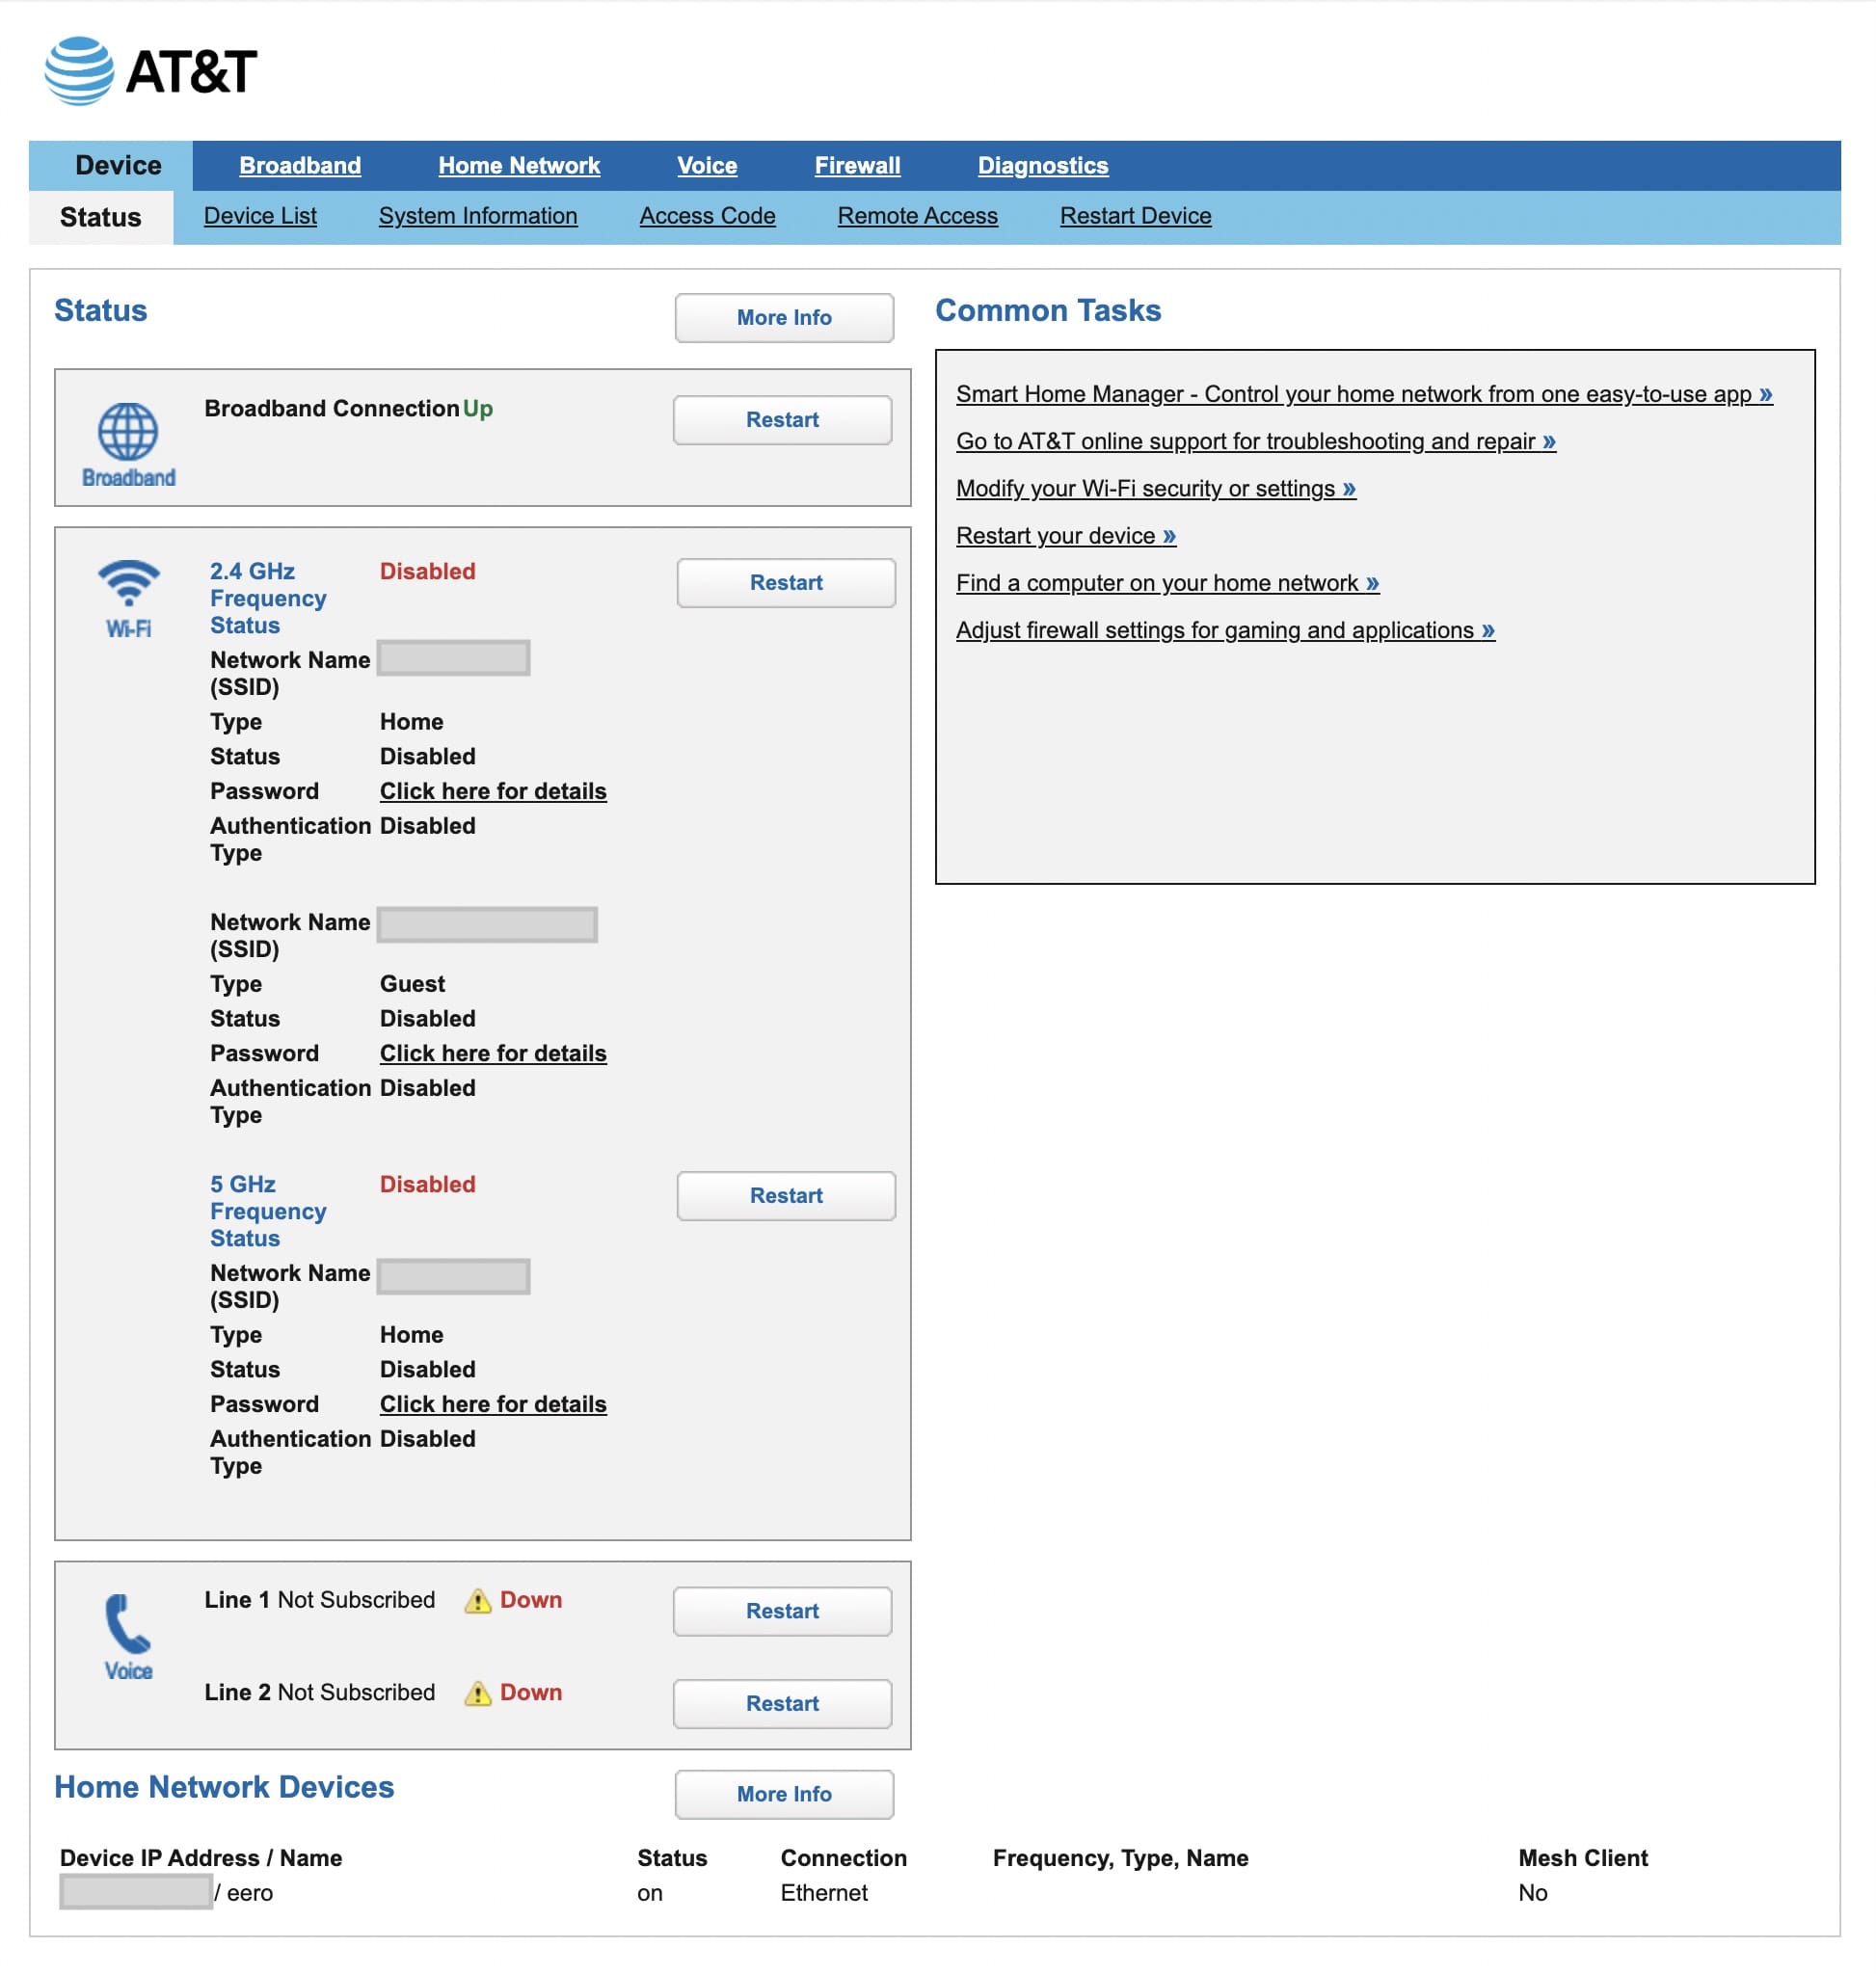
(I do not have voice service through AT&T, so both lines are showing as down.)
Step 11: Verify on Router and Devices That You Have a Public IP Address
This final step will vary depending on your router. But you’ll want to go into your router’s network settings and verify that your WAN IP address is a public IP. If it is not, there’s a mistake in one of the steps above and you are still within a double NAT.
On any device on your network, you’ll also want to verify your IP address matches what’s above. There are plenty of services that provide this, but I prefer Nord’s because it’s mostly ad-free and it also shows my IP address.
Verify your IP address here: https://nordvpn.com/what-is-my-ip/
Extra Credit: Bypassing the Gateway Entirely
This is admittedly a lot of steps to set up IP Passthrough mode. Wouldn’t it be easier if we just didn’t have to use AT&T’s proprietary gateway?
I didn’t pursue that route, but there are plenty of examples on Reddit or YouTube of people who have done so. Most of the time it looks like they use an SFP+ module to connect the fiber directly to their own router. It can bring improved speeds and reduced latency compared to using AT&T’s gateway.
While it might lead to a cleaner install, I opted against it because I still would have had to keep AT&T’s equipment in a closet just in case I ever canceled my service. Earlier this year, I upgraded my fiber plan and they sent me a new gateway, which I would have had to activate first before I would have seen the improved speeds.
Ultimately, while it does mean keeping one extra device plugged in, IP Passthrough mode enables me to do everything I was after. It eliminates the double NAT headache, I can forward ports to hosted devices, and it largely turns AT&T’s gateway into an old-school modem.
If you went the more adventurous route and bypassed the gateway entirely, I’d love to know how it went for you. Send me a DM and convince me to go after my extra credit!